 |
| Calico Cat 1940's Apron Pattern |

Friday, August 13, 2010
5 yards of Bias Tape from a Single Fat Quarter!!!


Tuesday, August 10, 2010
Upcycle Project: Organizer for Hair Accessories

The gallon Ziplock bag that had served as my daughter's hair accessory container was a disaster. I poked around online, in shops, and blogs looking for a better alternative. I liked the french bulletin board style, but that was still going to leave a lot of unorganized accessories. Thank you Goodwill! I was browsing through our local Goodwill when I came across this Pottery Barn wall organizer and decided it was perfect for the job. After scrounging through the house I found enough materials on hand to please by daugher's champagne taste on my beer budget. The whole thing cost me $3.99!

Wednesday, July 28, 2010
I-Cord Project: Flower Bracelet

My daughter absolutely loves the Bond Embellish-Knit! I bought to make cords for my wool soakers. She's made yards and yards of I-cord, but mostly it sits wound in balls or wrapped around her dolls like fuzzy little boa constrictors. One day when we got tired of beading bracelets, I decided to try something new - an I-cord bracelet. So easy!
The flower:
1. Cut/create a length of I-cord.
2. Tie off ends, but leave, long 6-10" tails on both ends.
3. Mark 5 equal sections (or whatever # of petals you prefer).
4. Thread one of the tails onto a yarn needle. Catch a loop of yarn at each of the section points you marked.
5. Pull the tail tight until the petals form. Use the other tail to tie a knot.
6. Select a button and attach using one or both of the tails. Do not cut tails yet!
The bracelet:
1. Cut/create a length of I-cord to fit wrist, but make sure it has enough stretch to slide on and off.
2. Tie off ends.
3. Use the tails to tie ends to one another, then use a yarn needle to hide the threads within the I-cord tube. The bracelet should look like a snake eating it's tail and there should be no visible tails.
4. Place your flower upside down on the work space so the good side is down and the two tails are up.
5. Set the bracelet center (where the snake is eating it's tail) on the center of your flower.
6. Use the tails on the back of the flower to tie the flower to the bracelet.
7. Again, use a yarn needle to hide the threads within the I-cord.
Your Done! Wear with pride & send in your pictures!

Tuesday, July 20, 2010
Angie's Free Diaper Patterns is up and running!

I can't believe it took me so long to sit down and do it, but I finally got my diaper pattern in a format for sharing online. I didn't want this blog to be overrun with diaper sewing and reviews, so I started a separate page just for diaper sewing. The page is functional, but not pretty. I'll get to that...eventually. LOL! Instructions and tutorials are still coming. :-)
Wednesday, June 30, 2010
New Graphics
Thank you to Helen Ziga of 1-Stop Graphics Shop for designing my new banner! Check out her other great work on Etsy.


Monday, May 17, 2010
Easy Superhero Reversible Cape

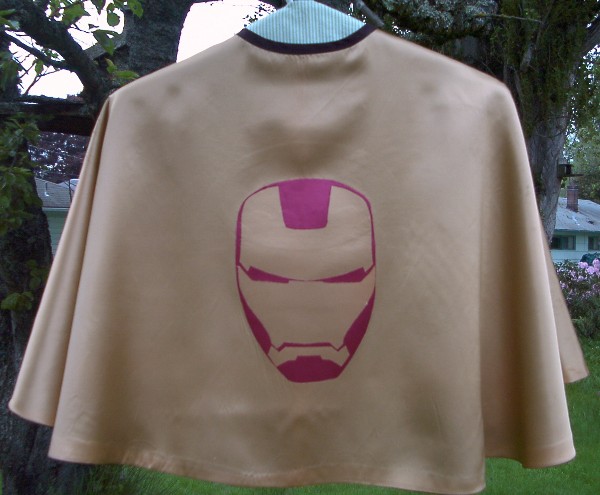
- Use a large garbage bag to trace out your pattern and add 5/8" seam allowance.
- Cut from two coordinating fabrics. (I recommend using the same type of fabric for both sides if you are a beginner.)
- Pin right sides together...use twice as many pins as usual if you are using a slippery fabric!
- Sew together leaving the neckline open.
- Remove pins and press.
- Optional: top stitch
- Cut length of double-sided bias tape to length or for a girl, try ironing 1" ribbon in half.
- Pin bias tape/ribbon to neckline.
- Sew full length of bias tape and tack ends or for ribbon, just along the neckline.
- Optional: double stitch neckline for strength
- Download your favorite superhero logos and create paper pattern.
- Apply double sided fusing medium to the logo fabric using manufacturer's directions.
- Cut out logo using Exact-o knife or scissors.
- Apply to cape using manufacturer's directions.
Saturday, May 1, 2010
Altered & Embellished Girls T-Shirt

My daughter has very broad shoulders and I frequently find myself making alterations to her clothes so the length is appropriate. Back in the '80s, when my mom was doing this for me, the extra bits of fabric became matching hair scrunchies, but the hair scrunchie has no place in 2010. My daughter loves the princess frills, so I decided to try out a technique to embellish the otherwise basic shirt. I had read about the technique in Threads Magazine a few months back. (Sorry I couldn't find a link!) It's a super simple process. (1) Cut strips of fabric. (2) Stitch a basting stitch down the center. (3) Gather. (4) Pin to fabric and stitch. (5) To create flowers use a stabilizing fabric and stitch in a circle then sew onto shirt.
Subscribe to:
Posts (Atom)